#javascript tips
Explore tagged Tumblr posts
Visit Tumblr Blog
Explore Tumblr blogs with no restrictions, modern design and the best experience.
Last Seen Tumblr Blogs


Fun Fact
Tumblr has a 66 index score for customer satisfaction in the US.
Text
Introduction To HTML
[Note: You need a text editor to do this. You can use Notepad or Text Edit. But it's so much better to download VS Code / Visual Studio Code. Save it with an extension of .html]
HTML stands for Hyper Text Markup Language
It is used to create webpages/websites.
It has a bunch of tags within angular brackets <....>
There are opening and closing tags for every element.
Opening tags look like this <......>
Closing tags look like this
The HTML code is within HTML tags. ( // code)
Here's the basic HTML code:
<!DOCTYPE html> <html> <head> <title> My First Webpage </title> </head> <body> <h1> Hello World </h1> <p> Sometimes even I have no idea <br> what in the world I am doing </p> </body> </html>
Line By Line Explanation :
<!DOCTYPE html> : Tells the browser it's an HTML document.
<html> </html> : All code resides inside these brackets.
<head> </head> : The tags within these don't appear on the webpage. It provides the information about the webpage.
<title> </title> : The title of webpage (It's not seen on the webpage. It will be seen on the address bar)
<body> </body> : Everything that appears on the webpage lies within these tags.
<h1> </h1> : It's basically a heading tag. It's the biggest heading.
Heading Tags are from <h1> to <h6>. H1 are the biggest. H6 are the smallest.
<p> </p> : This is the paragraph tag and everything that you want to write goes between this.
<br> : This is used for line breaks. There is no closing tag for this.
-------
Now, we'll cover some <Meta> tags.
Meta tags = Notes to the browser and search engines.
They don’t appear on the page.
They reside within the head tag
<head> <meta charset="UTF-8"> <meta name="viewport" content="width=device-width, initial-scale=1.0"> <meta name="description" content="Website Description"> <meta name="Author" content="Your Name"> <meta name="keywords" content="Websites Keywords"> </head>
Line By Line Explanation:
<meta charset="UTF-8"> : Makes sure all letters, symbols, and emojis show correctly.
<meta name="viewport" content="width=device-width, initial-scale=1.0"> : Makes your site look good on phones and tablets.
<meta name="description" content="Website Description"> : Describes your page to Google and helps people find it.
<meta name="author" content="Your Name"> : Says who created the page.
<meta name="keywords" content="Website's Keywords"> : Adds a few words to help search engines understand your topic.
_____
This is my first post in this topic. I'll be focusing on the practical side more than the actual theory, really. You will just have some short bullet points for most of these posts. The first 10 posts would be fully HTML. I'll continue with CSS later. And by 20th post, we'll build the first website. So, I hope it will be helpful :)
If I keep a coding post spree for like 2 weeks, would anyone be interested? o-o
#code#codeblr#css#html#javascript#python#studyblr#progblr#programming#comp sci#web design#web developers#web development#website design#webdev#website#tech#html css#learn to code#school#study motivation#study aesthetic#study blog#student#high school#studying#study tips#studyspo#website development#coding
98 notes
·
View notes
Text
Convert HTML to Image: A Step-by-Step Guide ✨

Do you want to turn some HTML code you've made that's on your website and have a way to convert it into an image for you to save?
Well, look no further! I too wanted to do the same thing but funny enough, there weren't any straightforward tutorials out there that could show you how! After hours of searching, I finally discovered the solution~!
This is an old tutorial I made 🐼

💛 Set your environment
Before we dive into the conversion process, I'll assume you already have your HTML code ready. What you want to learn is how to turn it into an image file. You should have a good grasp of HTML and JavaScript. For this tutorial, we'll use the following HTML code example:

We won't include the CSS code, as it doesn't affect this tutorial. The JavaScript file (script.js) at the bottom of the body element is where we'll add the functionality for the conversion.
Your page should resemble the following:

As you can see, the "Click me" button will handle the conversion. We aim to convert everything within the div.info-div into an image.
💛 Using the html2canvas JavaScript Library
The html2canvas library allows you to take screenshots of webpages and target specific elements on a screen. Here are the steps to include the library in your project:
The steps to put the library in your project:
Visit the html2canvas website for more information.
Copy the CDN link from here

and include it in a script tag in your project's head tag in the HTML file:

That's it for including the library on the HTML side. Now, let's move on to the JavaScript code.
💛 JavaScript Functionality
Here's the JavaScript code to handle the conversion:

In this code, I want to turn the whole div.info-div into an image, I put it into a variable in const div = document.querySelector(".info-div");.
I also put the button into a variable in const button = document.querySelector("button");
I added a click event listener to the button so when the user clicks the button, it will follow the code inside of the event listener!
You can find similar code like this in the documentation of the html2canvas library:

What is happening here is:
We add the div (or what the element we want to take an image of) into the html2canvas([element]).then((canvas)
Added the image file type url to a variable = const imageDataURL = canvas.toDataURL("image/png"); - You can replace the png to other image file types such as jpg, jpeg etc
Created an anchor/link tag, added the href attribute to imageDataURL
The download attribute is where we will give the default name to the image file, I added "dog.png"
Perform the click() function to the anchor tag so it starts to download the image we created
And that's it!
💛 The End
And that's it! You've successfully learned how to turn your HTML into an image. It's a great way to save and share your web content in a unique format.

If you have any questions or need further clarification, please comfortable to ask. Enjoy converting your HTML into images! 💖🐼
#my resources#coding#codeblr#programming#progblr#studying#studyblr#programmer#html#html css#javascript#neocities#coding tips#html5 tutorial#html tutorial
155 notes
·
View notes
Text
i started reading an article and couldn’t continue due to not having a subscription.
then i remembered. the answer lies in ✨disabling Javascript ✨
tutorial links below, for anyone who also can’t find The OG Tumblr Post:
Chrome:
Firefox:
#disabling javascript#javascript#dev tools#hacks#life hacks#privacy#chrome#firefox#browsing tips#tech tips#adblock#anti capitalism#shameless#i was reading about disability representation in shameless#reading tips#accessibility#internet freedom#fuck capitalism#punk
9 notes
·
View notes
Text
Programming pro tip:
Set your IDE's font to Comic Sans to experience what it's like to use JS
90 notes
·
View notes
Text
This shit is confusing as fuck
17 notes
·
View notes
Text
While still going through my JS review, I came across Truthy & Falsy, which lead me to short-circuit evaluation, and I was a bit confused at first, but after reading this article above, I understood it.
So. . . just posting this here for anyone that maybe interested. . . ^_^
8 notes
·
View notes
Text
tumblr what the fuck is a reblog graph
#why do i have that and not a response to the 20 sideblogs i asked for enabled javascript on#i will send additional requests tumbs ik u only have like 90 employees now but i'll do it#if i buy the lil icon thingies will u reply to me tumbs#bc i do want the ghost and the crab#i have mass amounts of guilt but i do not have shame so#i thought i somehow accidentally enabled tipping on posts and was like wait i gotta turn that off#no its a reblog graph?? WHAT IS THAT TUMBLR
2 notes
·
View notes
Text
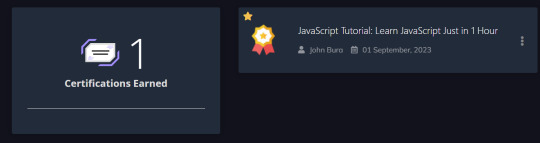
01.09.2023 : it was quite easy
#happy#certification#certificate attestation#javascript#studies#studywithme#study tips#studystudystudy#studyspiration#studygram#study notes#studyblr#study intro post#studyblr intro#student#college#study blog#psychology#psicologia#study aesthetic#study motivation#study#my stuff#study intro#study inspiration#study in Brazil#studies version
4 notes
·
View notes
Text
Tips Mempercepat Loading Website untuk Meningkatkan Peringkat di Google
Sudah tau kan? Apa akibatnya jika halaman website anda lambat saat diakses? situs web yang lambat bisa sangat menjengkelkan! Di dunia digital yang serba cepat ini, kecepatan adalah kunci untuk memberikan pengalaman pengguna yang optimal. Situs web yang memuat lambat dapat berdampak negatif, seperti: Pengalaman Pengguna Buruk: Pengguna cenderung meninggalkan halaman jika memerlukan waktu lebih…
#AMP untuk mobile#caching browser#cara mempercepat website#cara optimasi website#CDN untuk website#Google PageSpeed Insights#hosting berkualitas#kecepatan website#loading website cepat#loading website lambat#mempercepat website WordPress#meningkatkan konversi website#meningkatkan peringkat Google#minifikasi file website#optimasi CSS dan JavaScript#optimasi gambar#pengalaman pengguna website#performa website#plugin WordPress#SEO terbaik#SEO website#tips optimasi website#tools analitik website
0 notes
Text
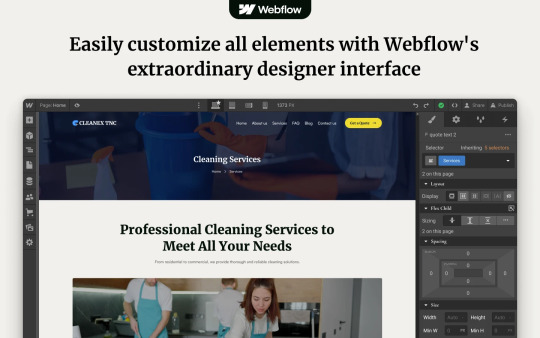
Revolutionizing Cleaning Business Webflow Websites with Cleanex TNC
In today's digital era, having an optimized and professional website is crucial for every business, especially in the cleaning service industry. Whether you are running a home cleaning service, commercial cleaning, or janitorial business, your website plays a vital role in attracting customers and establishing credibility. This is where Cleanex TNC comes in—a modern, highly customizable Webflow template designed specifically for cleaning businesses.
Why Choose Cleanex TNC?
A well-designed website should not only look aesthetically pleasing but also offer functionality, responsiveness, and seamless user experience. Cleanex TNC is a premium Webflow template that helps cleaning service providers establish a strong online presence without the need for extensive coding knowledge.
1. User-Friendly Design & Navigation
A clutter-free, easy-to-navigate website can make a significant difference in user retention and conversion rates. Cleanex TNC comes with a sleek, intuitive interface that ensures visitors can find the information they need with ease. The template is structured to guide potential clients through your services, pricing, and contact details effortlessly.
2. SEO-Optimized & Fast-Loading Pages
Speed and SEO play a crucial role in search engine rankings. Cleanex TNC is built with SEO best practices, ensuring that your site ranks higher on Google and attracts organic traffic. The optimized code and fast-loading pages enhance user experience and reduce bounce rates, which directly impacts conversions.
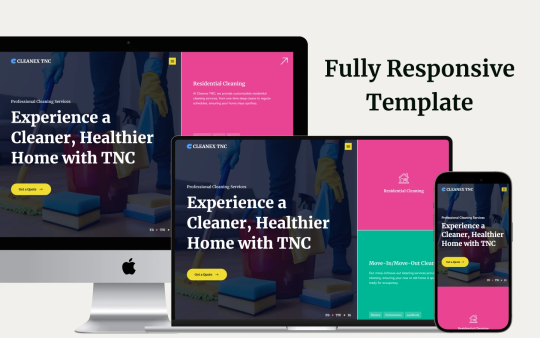
3. Mobile-Responsive & Cross-Browser Compatibility
In a mobile-first world, having a fully responsive website is non-negotiable. Cleanex TNC ensures a seamless browsing experience across all devices—whether it’s a smartphone, tablet, or desktop. Additionally, the template is compatible with all major browsers, ensuring consistent performance across different platforms.
4. Engaging & Customizable Sections
One of the key advantages of Cleanex TNC is its flexibility. The template offers various sections that can be easily customized to reflect your brand identity. You can modify:
Service Pages: Clearly outline your cleaning services, packages, and pricing.
Testimonial Sections: Showcase client feedback to build trust and credibility.
Call-to-Action (CTA) Buttons: Encourage visitors to request a quote or book a service instantly.
Gallery & Portfolio: Display before-and-after images to highlight the effectiveness of your services.
5. Built-in Contact & Booking Forms
Having an easy-to-use contact form is essential for customer engagement. Cleanex TNC includes an integrated booking system, allowing clients to schedule services directly from your website. This feature improves convenience and streamlines the booking process, enhancing customer satisfaction.
6. Blog & Content Marketing Ready
A blog section can help you engage your audience and improve your website’s SEO. With Cleanex TNC, you can share cleaning tips, industry news, and business updates to keep visitors informed and encourage repeat visits. Content marketing is a powerful tool for establishing your brand as an authority in the cleaning industry.
7. Conversion-Driven Design
From strategically placed CTA buttons to well-structured service pages, Cleanex TNC is designed to drive conversions. The professional layout and engaging visuals help build trust, ultimately increasing inquiries and bookings.
How to Get Started with Webflow Cleanex TNC?
Setting up your cleaning business website with Cleanex TNC is simple and hassle-free. Just follow these steps:
Purchase & Download: Get access to the template from the official Webflow marketplace.
Customize the Design: Modify colors, fonts, images, and content to align with your brand.
Add Your Services & Pricing: Clearly outline what you offer and at what cost.
Optimize for SEO: Ensure your site is optimized with relevant keywords and meta descriptions.
Launch & Promote: Publish your site and start marketing your services online.
Final Thoughts
A professional website is no longer a luxury but a necessity for cleaning businesses. Cleanex TNC simplifies the process of building a high-performing website that not only looks great but also drives customer engagement and conversions. If you’re looking for a ready-to-use Webflow template that meets all the industry standards, Cleanex TNC is the perfect choice. Get started today and elevate your cleaning business to new heights!
#web ui#uidesign#ui ux design#ui ux development services#web development#website#wordpress development#web developers#websitedevelopment#webflow#webflowtemplate#webflow development services#webflowdesign#coding#html#html css#javascript#reactjs#web developing company#cleaning services#cleaning business#house cleaning#home cleaning#cleaning tips#organization#cleaning technology#ui ux company#website design#website desing bd#website development
1 note
·
View note
Text
Mastering Behavioral Questions: A Guide to Answering Interview Questions
Mastering Behavioral Questions: A Guide to Answering Interview Questions Have you ever been stumped by a behavioral question during an interview? You’re not alone. Many candidates find it challenging to navigate these types of questions, but with the right approach and preparation, you can impress your interviewer and land your dream job. What Are Behavioral Questions? Behavioral questions are…
#behavioral questions#interview#interview answers#interview preparation#interview techniques#interview tips#JavaScript#job interview
0 notes
Text
Day 6 [Forms In HTML]
Introduction To HTML
Day 2 [Multimedia Elements In HTML]
Day 3 [Table in HTML]
Day 4 [Link Tag In HTML]
Day 5 [Lists In HTML]
Forms are basically used for collecting user information. And they are really important to learn. Here's a simple form in HTML:
Code:


Line By Line Explanation:
<form>: Used for creating forms. All the form elements go in this tag. Action: When submitted, data is sent to this file or URL [index.html] Method="post": Sends data
<label> : This describes the input tag for="___": Connects the label to the input with id="name" id : gives a unique identification to the tag <input>: It's used to make the form elements
<input> Type Elements :
type="text" : A simple text box is created.
type="email" : A box to input email.
type="checkbox" : A small square that users can tick. Can select multiple options using this.
type="radio" : A small circle, you can only select one option.
type="submit" : A button that submits the data to the server.
<textarea>: Accepts multiple lines of text. rows="4": It creates 4 lines cols="30": It creates 30 characters
<select> : Creates a drop-down list <option>: Creates an item in the dropdown. value="colorname": This is the data sent to the server if chosen.
Output For The Code:

_______________________
Hope This Helps !!
#code#codeblr#css#html#javascript#python#studyblr#progblr#programming#comp sci#web design#web developers#web development#website design#webdev#website#tech#html css#learn to code#school#study motivation#study aesthetic#study blog#student#high school#studying#study tips#studyspo#website development#coding
34 notes
·
View notes
Text
Mini React.js Tips #1 | Resources ✨

I thought why not share my React.js (JavaScript library) notes I made when I was studying! I will start from the very beginning with the basics and random notes I made along the way~!
Up first is what you'll need to know to start any basic simple React (+ Vite) project~! 💻
What you'll need:
node.js installed >> click
coding editor - I love Visual Studio Code >> click
basic knowledge of how to use the Terminal

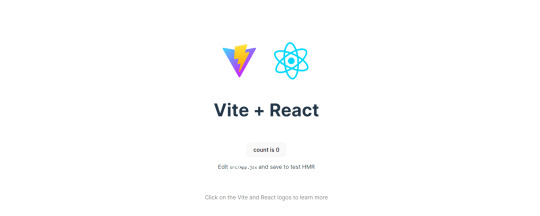
What does the default React project look like?
Step-by-Step Guide
[ 1 ] Create a New Folder: The new folder on your computer e.g. in Desktop, Documents, wherever that will serve as the home for your entire React project.
[ 2 ] Open in your coding editor (will be using VSCode here): Launch Visual Studio Code and navigate to the newly created folder. I normally 'right-click > show more options > Open with Code' on the folder in the File Explorer (Windows).
[ 3 ] Access the Terminal: Open the integrated terminal in your coding editor. On VSCode, it's at the very top, and click 'New Terminal' and it should pop up at the bottom of the editor.


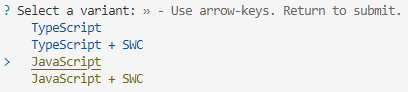
[ 4 ] Create the actual React project: Type the following command to initialize a new React project using Vite, a powerful build tool:
npm create vite@latest
[ 5 ] Name Your Project: Provide a name for your project when prompted.

[ 6 ] Select 'React' as the Framework: Navigate through the options using the arrow keys on your keyboard and choose 'React'.

[ 7 ] Choose JavaScript Variant: Opt for the 'JavaScript' variant when prompted. This is the programming language you'll be using for your React application.
[ 8 ] Navigate to Project Folder: Move into the newly created project folder using the following command:
cd [your project name]
[ 9 ] Install Dependencies: Execute the command below to install the necessary dependencies for your React project (it might take a while):
npm install

[ 10 ] Run the Development Server: Start your development server with the command (the 'Local' link):
npm run dev

[ 11 ] Preview Your Project: Open the link provided in your terminal in your web browser. You're now ready to witness your React project in action!
Congratulations! You've successfully created your first React default project! You can look around the project structure like the folders and files already created for you!
BroCode's 'React Full Course for Free' 2024 >> click
React Official Website >> click
Stay tuned for the other posts I will make on this series #mini react tips~!
#mini react tips#my resources#resources#codeblr#coding#progblr#programming#studyblr#studying#javascript#react.js#reactjs#coding tips#coding resources
116 notes
·
View notes
Text
#Technology Magazine#Free Online Tool#Interactive Tools and Collection#Internet Tools#SEO Tools#Learn Search Engine Optimization#Computer Tips#Freelancer#Android#Android Studio#BlogSpot and Blogging#Learn WordPress#Learn Joomla#Learn Drupal#Learn HTML#CSS Code#Free JavaScript Code#Photo and Image Editing Training#Make Money Online#Online Learning#Product Review#Web Development Tutorial#Windows OS Tips#Digital Marketing#Online Converter#Encoder and Decoder#Code Beautifier#Code Generator#Code Library#Software
0 notes
Text
Resolve Cache Issues After ThingWorx Upgrade
Introduction After upgrading the ThingWorx Platform, you may encounter several issues related to caching. Common problems include missing localization tokens in Composer labels, Advanced Grid not rendering properly, widgets not displaying correctly after installing new version extensions, and difficulty with deleting specific entities or User entities. Often, these issues come from cached files…
0 notes
Text
youtube

Onboarding - html, css y js demo
#youtube#nicaragua🇳🇮#developers#artist on kofi#talent#twitter#matagalpa#chriisduran#html#htmlcoding#html5#javascript#frontpage#frontend developer#youtube video#shorts#reels#youtuber#youtube channel#tutorial#how to earn money#tools#tips#life hacks#podcast#technology#tech#call of duty#gamer#gaming
0 notes